Most MRCOOL mini splits are designed for DIY (do-it-yourself) installation. These systems come with everything you need for most installations, except for electrical equipment and tools. Let's take a deep dive into what parts are included with the MRCOOL DIY mini splits and what extra parts you may need to complete your installation.
What Comes Included with your MRCOOL DIY Mini Split
In your MRCOOL DIY mini split system package, you will find the following parts:
-
Indoor Air Handler:
- Either a wall-mounted unit or ceiling cassette, the MRCOOL indoor air handler distributes air throughout your space. Inside the air handler, you will find the fan, air filter, and controls needed for optimal temperature control and air quality.
-
Outdoor Condenser:
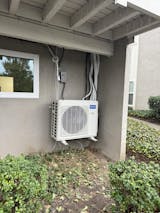
- The condensing unit holds the compressor and condenser, and is stored outside. It is a key part of your mini split system and is built to withstand outdoor weather conditions.
-
Line Set:
- The line set is the bridge between the indoor air handler(s) and the outdoor condenser. The line sets used in the MRCOOL DIY mini splits are pre-charged with refrigerant, which makes installing these systems simple and efficient.
-
Remote Control:
- The included remote control allows you to change your set temperature and settings without having to directly interact with your unit.
-
Smart Controller Dongle:
- The Smart Controller dongle enables you to control your MRCOOL mini split through your phone, via the MRCOOL SmartHVAC app.
-
Communication Cable:
- The included communication cable allows your indoor and outdoor units to communicate with each other and synchronize the various parts of the system for the most optimal operation.
-
Mounting Template and Bracket:
- The mounting template is included as a guide for where to drill holes and place your wall-mounted air handler. The mounting bracket will then be installed in that position and will be used to support and hold your air handling unit.
-
Small Hardware Pieces:
- In the box, you will find the necessary screws, bolts, and fasteners for the installation. You will also find a small bag with extra hardware, in case you lose some during the installation.
-
Remote Control Mount:
- To reduce the chances of misplacing the remote control, MRCOOL includes a remote control holding mount that you can install on the wall and store your remote in when it's not in use.
-
Allen Wrench:
- The allen wrench in the package is used to open the refrigerant lines.
-
Neoprene:
- Used in the installation to insulate and protect various parts of the system from environmental factors.
-
Insulation Material:
- Reduces heat exchange to reduce energy loss and maintain the desired temperature within the system.
-
Sound Dampener Pads:
- Strategically designed to reduce vibrations and sound levels during operation.
-
UV Tape:
- Reduces sunlight damage by protecting refrigerant lines from ultraviolet rays.
-
Wall Sleeve:
- Helps to seal the line set opening and prevent outdoor air and moisture from coming in.
-
Drain Line:
- Prevents water from accumulating by ensuring condensate is properly drained.
For more information on what comes with the MRCOOL DIY mini spit, refer to the units installation manual.
Additional Parts You Might Need
Although most of the needed installation parts come included with the MRCOOL mini split system packages, you might need some additional parts to get everything up and running:
-
Disconnect and Whip:
- A disconnect and whip is used to extend power from the main breaker box to the outdoor condenser.
-
Drain Line Extension:
- For systems placed far away from outside walls, a drain line extension might be required to properly dispose of condensate.
-
Condenser Wall Mount:
- If you'd prefer to keep your outdoor condensing unit off the floor and mounted on a wall, you can purchase a MRCOOL condenser wall mount bracket.
-
Line Guard:
- Use to contain, protect, and conceal the pre-charged line sets. These MRCOOL line guards come in tan, gray, and white.
-
Float Switches:
- Other parts like float switches may be required to meet your local building codes.
Tools Needed for Installation
To complete you MRCOOL mini split installation, you will need some common household tools:
-
Handheld Drill:
- Used to make mounting holes and line set holes, as well as fastening and securing other components.
-
Hole Saw:
- Attached to the drill to create the opening for the line sets.
-
Adjustable Crescent Wrenches:
- Two crescent wrenches should be used, turned in opposite directions to tighten connections.
-
Measuring Tape:
- Ensures accurate measurements when placing units.
-
Level:
- Placed on mounting guide and mounting plate to ensure air handlers are installed evenly.
-
Ladder:
- Required for reaching hard to reach places.
-
Multi-Bit Screwdriver:
- A multi-bit screwdriver will be required for fastening screws and hardware.
-
Soapy Water:
- Soapy water needs to be sprayed on refrigerant line connections to check for leaks.
Let's Sum It Up
As you can see, MRCOOL mini splits are made with the user in mind. Designed with simple installation in mind, MRCOOL's mini split systems come with all the installation parts you will need, with the exception of some tools and case-specific pieces. With this guide, we hope to prepare you ahead of time to make sure your installation goes as smooth as possible. If you want a more in depth idea of how to install MRCOOL mini splits, we suggest you read the installation manual that comes with the MRCOOL DIY systems.


